Home server
The beginning
In early 2021 I wanted to play Minecraft with a friend. The problem was, I was tired of having to open the desktop Java server application every single time, and wanted something more permanent - something that didn’t need to be turned on and off. Something that ran all the time. That’s basically how I really intuitively found out what a server was - just a simple machine (any machine!) that served programs (services) to other machines.
It evolved from there.
Original setup
A Lenovo Thinkpad T420, with a whopping 4 GB of memory, 100 GB of storage, and an Intel i5-2520M processor with a base frequency of 2.5 GHz, straight out of 2012. I was going to turn this little laptop into the best home server ever, the best I knew how - by installing Linux on it, of course.
For some naive reason of wanting to utilize the existing hardware to its maximum potential, I found an extremely minimalistic, very fast and supposedly stable distribution, called Void Linux. Apparently, it was perfect for low-powered machines, such as the one I had for this task. As I later found out, Debian would have been the obvious choice, had I known that a niche operating system and servers do not go hand in hand. The widespread community knowledge and support would have really helped me out, plus the performance difference is basically unmeasurable, but alas.
To use the resources I had as efficiently as possible, I couldn’t just use the Vanilla MC server implementation, no no, it lagged too much. For this task I found a community project, which was aimed at making it faster and easier to run - PaperMC.
Everything was set up in a Docker container for portability and ease of configuration. Somebody had already made a popular container for automatically downloading and configuring everything to run as smoothly as possible, so why would I go to the effort just to do a worse job? I assigned 2 GB of RAM and started it - everything went smoothly. No it didn’t, of course it didn’t. Quite a few evenings were spent trying to debug and fit all the moving pieces together smoothly - even though there weren’t that many of them.
The good news is, I succeeded - the server worked, and it worked well (mostly).
Additions
As the Docker environment was online and ready to go, I wanted to try adding more applications, not just games. One of the first few I added was a P2P client for downloading movies and TV shows. I wanted to have the ability to start downloads on the server, while being away from home, and, for example, on a bad connection, or even worse, on mobile data. But this required a few additional moving pieces.
The very next application I set up was a VPN server, with Wireguard. At the time, a Docker container provided the simplest configuration, but it introduced some complexity into the networking. Once I got it up and running though, it was a piece of cake.
Another important addition was Jellyfin, a media platform which allowed me to actually watch the movies from the server, streaming on demand.
Improvements & upgrades
100 gigabytes was not a lot of storage space, which required me to somehow add more, but I did not want to mess with the existing OS install yet - no transferring files. After some searching, one solution popped up, which was to change the CD ROM of the laptop into an SSD drive caddy. It allowed me to add another 500 GB of speedy storage and was enough for now.
Next, a web dashboard called Homepage was installed, and an easy to set up reverse proxy + manager Nginx Proxy Manager. This completed the setup and allowed an easy way to not only access services using a subdomain (as compared to ip adress + port) and manage them all in one place.
I think after a year or two of using the server, it was finally time to move on to a more stable distro - Debian, which was time-tested and proven, a much better choice. Void Linux lacked in stability a lot and broke a few times while updating packages. And Debian was not that much more bloated, in fact, it’s lean and fast . Additionally, I bought a couple cheap 4 GB SODIMMs, because it really started to struggle on just 2x2 GB sticks. This completed the setup for the time being.
Current setup
Sometime in early 2025 I upgraded the server’s hardware from its humble beginnings. The laptop was exchanged for a Dell Optiplex 3080, with the much newer i5-10500 processor. The jump from dual-core to hexa-core was pretty big - it allowed the server to have some real multithreading for once. At first, I installed Debian on it, just like before, but I read about the powerful isolation features of virtual machines and wanted to have a crack at it. So, I ditched the previous setup, backed up the most important configuration, and jumped straight to Proxmox (now this post’s cover photo should make sense!).
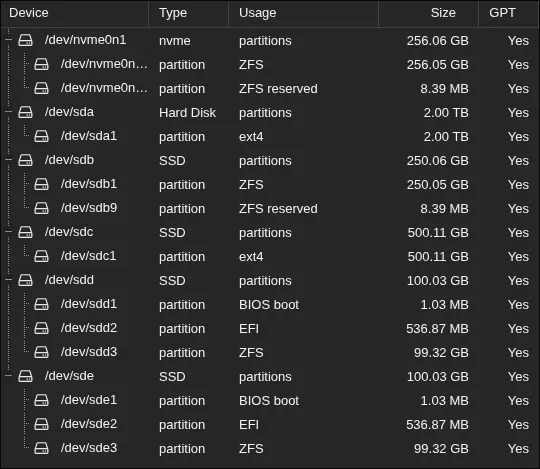
I installed Proxmox on to a couple 100 GB enterprise SSD’s, mirrored using ZFS - the Intel DC S3700, which can be had for cheap on the used market, with basically all of their durability left intact. During my research I discovered that it’s good practice to separate the VM drives from the OS drive for separation of concerns, and because Proxmox (or ZFS?) likes to eat consumers SSDs for breakfast, if special measures are not taken.
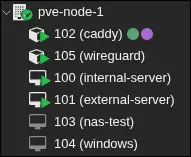
I used an NVMe drive that came with the PC, the 500 GB drive from the Thinkpad, and an old SSD + HDD from another desktop PC. This allowed me to not just have mirrored OS drives, but mirrored VM drives, and two left over for storing media. This is how this currently looks on the dashboard:
As for the memory, I changed the dual 8 GB sticks of RAM that came originally to dual 16 GB, for a whopping 32 GB in total, which is a lot to me to just have on a server PC.
I created two Linux Containers - LXCs - to house my new reverse proxy solution, Caddy. I got fed up with Nginx Proxy Manager’s GUI interface, and discovered the wonders of having your whole config in one simple Caddyfile. The other LXC was for Wireguard. Actually, to tell you the truth, I had moved the VPN to my MikroTik router, but it did not have the resources to fully saturate my internet connection - this new server hardware was perfectly suited for the job.
Next, I added two VM’s - one for locally accessible services, and one for externally accessible ones, to protect my local network as best as possible. For containerization and ease of configuration I used Docker once again - there is nothing better than simply copying over your Dockerfile and volumes, starting your containers, and having exactly the same setup as before.
In addition, VLANs were implemented to segregate services from one another, just in case a bad actor managed to gain access to one of them.
That’s it for now ;).